A roller or chuck rotary turns the object instead of moving the head in Y: glasses, bottles, tubes. Lùmen scales the Y axis to the cylinder’s surface and, when you go back to the flat bed, puts the previous setup back. The order of the steps matters: Lùmen reads the controller’s settings, but it can’t see when you plug in the rotary’s cable.
Setting up the rotary, once
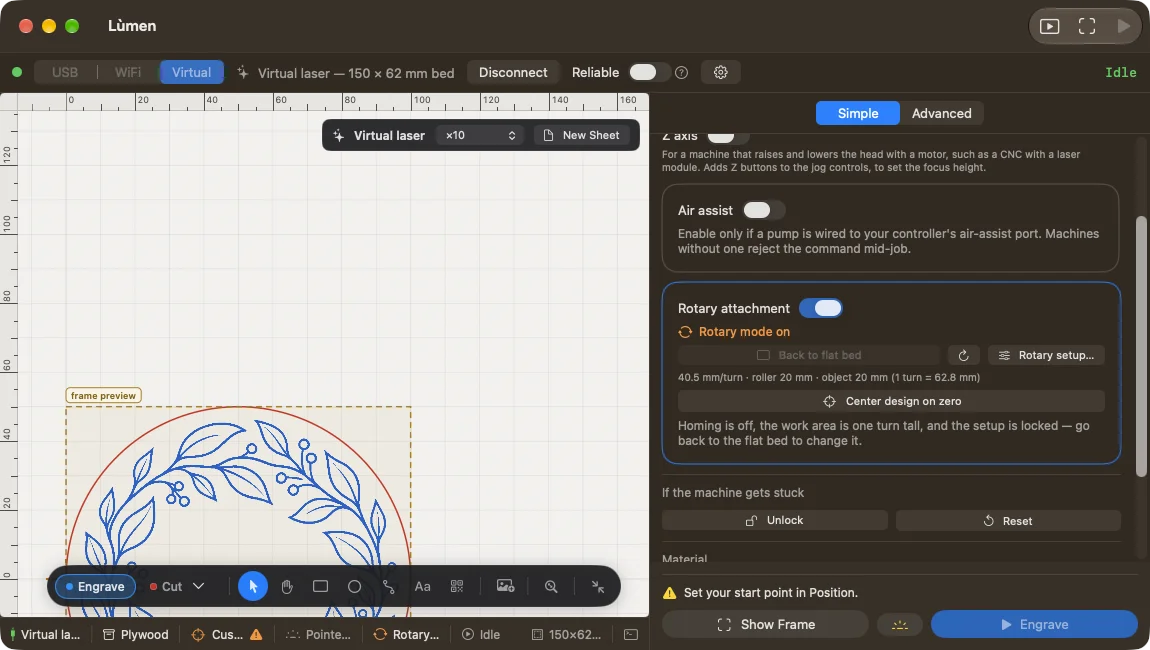
In Machine & material (in Advanced, the Machine section) turn on Rotary attachment: it tells Lùmen your machine has one. Then open Rotary setup…, with the machine connected.
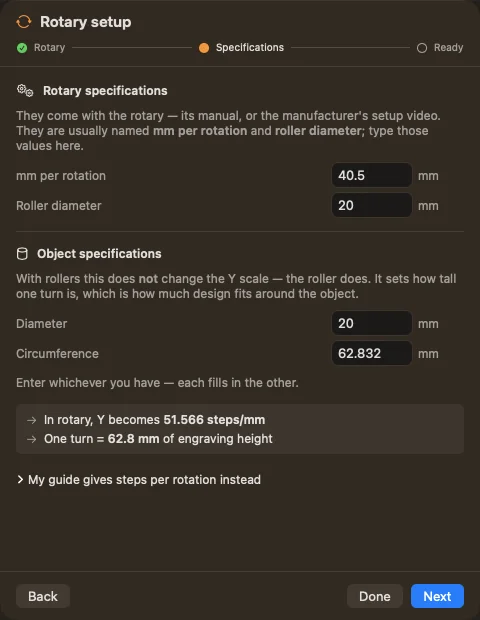
Choose Rollers or Chuck and enter the numbers from the rotary’s manual: the mm per rotation and, for rollers, the Roller diameter. Then the object’s diameter, or its circumference: one updates the other. Lùmen reads the Y axis’s flat-bed calibration from the controller, so it can put it back later.
How Lùmen scales Y: Change the machine's Y setting is for a rotary plugged in where the Y motor was, and Lùmen puts the setting back when you return to the flat bed. Scale the job leaves the machine’s settings alone and stretches Y in what Lùmen sends, for a machine that drives its rotary by itself; on the Atomstack P1 it is the only choice. Mirror the rotary axis is for an engraving that comes out mirrored round the object: a rotary mounted the other way round, or on the other side of the machine. It writes nothing to the machine, so you can switch it with the rotary on.
A rotary job, in order
- Put the rotary and the object on the bed, with the rotary’s cable unplugged. Rollers parallel to the frame.
- Line the head up while the gantry can still move in Y. If the machine can home, home it first. Then jog Y until the head is over the exact line to engrave, and X to where the design should sit. The laser pointer shows you the spot. Focus on the top of the cylinder, which sits a radius above the bed. This is the step you can’t come back to: with the rotary plugged in, the gantry no longer moves in Y.
- Set the zero there. The cross on the canvas is now the object’s crest, the one line where the beam arrives square and in focus.
- Check the numbers in the setup: the rotary and the object’s diameter.
- Press Switch to rotary and wait for Lùmen to confirm.
- Only now, plug the rotary’s cable in. Switching to rotary turns homing off in the machine: plug in first, and a homing cycle would spin the object until the machine raises an alarm.
- Place the design astride the zero. Center design on zero does it for you: half the engraving on one side of the crest, half on the other. The first time on a new setup, the ↻ button next to it turns the object exactly once with the laser off: mark the object and check that the mark comes back to its place.
- Show Frame. The object rolls back and forth across the design’s extent: you see exactly where the engraving will land.
- Start.
What changes in rotary mode
- Lùmen always uses Custom Origin and never homes.
- Jogging Y turns the object: that is how you present a particular side to the head, like a mug’s handle.
- The work area is one turn tall. A design taller than the circumference wraps onto itself.
- A saved project doesn’t remember the zero on a rotary: the object has been taken off, and its angle can’t be recovered. Repeat steps 2 and 3.
Going back to the flat bed
When you are done, press Back to flat bed and wait for Lùmen to confirm it has put the flat-bed values back (with Scale the job there is nothing to put back). Then unplug the rotary and reconnect the Y motor. Turn Rotary attachment off only if you won’t use it again. If Lùmen warns that the values it reads from the machine don’t match, follow its message before a flat-bed job.
With photos, step by step. The guide Rotary laser engraving on Mac: a working process shows the same procedure on a real machine.